The best things in life are free! Building an affordable coop from upcycled wood pallets
- Chad Batty
- Mar 17, 2025
- 3 min read


At Chicken de Ville, we believe in keeping our feathered friends comfortable without breaking the bank! With the need to build several new coops for our expanding meat and breeding chicken and turkey flock we loved this budget-friendly project; building a coop using upcycled wood pallets, sturdy cattle panels, and a trusty tarp. With a non-assembled 4 chicken coop listing for over $300(!) at North 40, we were happy to be able to build this 80 square feet coop (that can accommodate up to 20 chickens) for around $100 in materials and about 10 hours in labor. This is definitely a doable weekend or even a day job for a well-organized team!
Here’s a step-by-step guide to creating a durable and cozy home for your flock.
What You’ll Need:
1. Wood pallets (10-12 depending on your desired coop size)
2. Cattle panels (2-3 panels)
3. Heavy-duty tarp(s)
4. Zip ties or metal wire
5. Screws and a drill
6. Bolt cutter, saw, crow bar and hammer
7. Hinges and a latch for a door, t posts, hardware cloth
Step 1: Choose and Prep Your Location
Select a well-draining and relatively flat spot with where there’s enough space for the coop and for your chickens to roam freely in a run
Level/smooth the ground. While it's doesn't have to be completely level, some work in this area may help the build go smoother, straighter and look cleaner. We opted to skip ground prep for the initial coop but will be doing additional work in this area for the next one
Step 2: Create the Base
Align the wood pallets upright on the ground to form the coop’s foundation
Some opt to drive a t post into the ground for each pallet and thread the post through the pallet slats for extra stability; we didn't feel this was needed, except for the first couple to keep them upright
Secure them together with screws to ensure stability

Step 3: Build the Framework
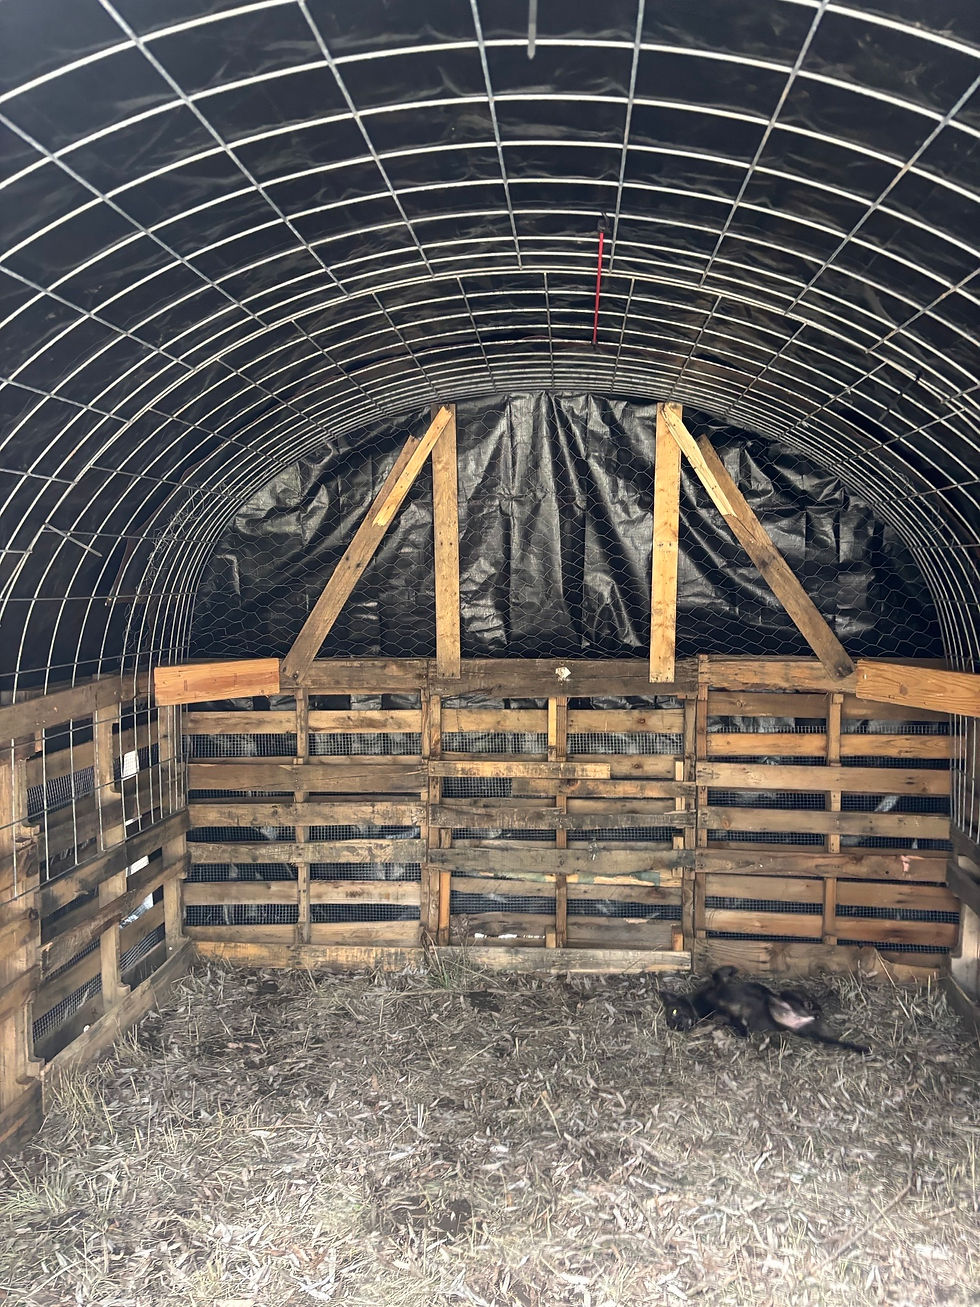
Bend the cattle panels into an arch shape, placing their ends on inside of the pallet base. This arched framework will form the skeleton of the coop
Add wooden boards horizontally along the interior of the arch to provide extra support and secure the cattle panel to the pallets. Secure these braces with screws or nails. This step will help the structure hold its shape and withstand weather conditions

Step 5: Build out end structure/bracing and door
Add wooden boards along the open ends of the arch to provide extra support and structure to attach hardware cloth/chicken wire to. Frame out, build and attach the door


Step 6: Attach hardware cloth to base and front of coop
To keep your chickens in and critters that would like to eat your chickens out, attach hardware cloth around the base of the structure and front of the coop, including the door
We are fans of using wood screws with large flat heads for this, some use staples or screws with fender washers

Step 7: Cover with a Tarp(s)
Drape the heavy-duty tarp over the arched framework, making sure it extends down the sides for full coverage.
Use bungie or tarp cords to secure tightly. For a snug fit, fold and tie down any loose edges.
We also enclose the back of the coop with another tarp hung vertically, but you could also leave this open if weather isn't a concern
Step 7: Customize and Furnish
Your coop is almost ready! Add bedding like straw or wood shavings inside. Include nesting boxes, perches, and a feeder and waterer to complete the setup. Don’t forget to predator-proof the area with a sturdy fence around the coop.


Voilà! In just a few steps, you’ve created a comfortable and practical coop that your flock will love. This project is perfect for hobby farmers like us who value resourcefulness and sustainability. Plus, your flock will feel right at home in their new digs.


Comments